Lori is not a professional quilter – she says – “I have never sold or exhibited a quilt, but I have given quite a few away.”
This is Lori’s Favourite Quilt – Its not her “best one”, but its the one that means the most to her, and she has written a piece about it for the Show & Tell Archive.
Born in the USA, Lori has “a job that takes me all over the world, working with individuals, institutions and communities that are striving for the social and economic advancement of their communities.” She is currently based in Macau – I had to look it up – it was originally a Portuguese colony, but is now part of China.
You can find out more about Lori’s travels,
and her quilts, on her blog – Quilt Musings
*******//*******
I began quilting about 20 years ago –
– after a burst appendix landed me in a hospital in Israel, followed by recuperation in the home of a friend whose wife was a quilter.
For many quilters, there is a tendency for your latest finished quilt to be your favorite, only to be replaced when you finish the next project. Circles, Revisited is the one I have draped across the sofa, its not the newest, but I think it is going to hold its place as my favorite for a good while to come.

It includes some of my favorite fabrics, has lots of free motion quilting, and demonstrates hat how no matter how inaccurate your tools and seam allowances, something beautiful can still be made from your efforts.
If I can make quilts anyone can!I was never really domestically inclined growing up, and even now, my sewing is confined entirely to quilting. I caught the quilt bug when I was on a project in Israel and ended up with peritonitis.
After a couple weeks in hospital, I moved to a friend’s home, where in addition to receiving wonderful care and attention that aided my recovery, I was introduced to the beauty and variety of quilts and taught the basics of hand piecing and quilting.
 It didn’t take too long, however, before I had switched to a sewing machine. I loved how quickly a quilt could come together and enjoyed adding intricate machine quilting that would take years if done by hand.
At the time I started this quilt though, I wanted to keep one project that I could carry with me and work on when I was away from my sewing machine.
I had the idea of a quilt made of quarter circles of batiks, with the circles fading in and out of a scrappy background. It never occurred to me to buy a professionally made-template to cut my fabrics — I just grabbed a plate from the cupboard, pulled a plastic folder from my stationary drawer and a handy quilter’s ruler, and used them to draw circle inside a square so that it approximated the quarter circle quilt blocks I had seen pictures of.
 I cut out the shapes using a pair of scissors, and voila, I had my templates. They were not the most accurate templates in the world…and in fact they degraded with use…but they were good enough. I started cutting my fabrics, and soon I had a pile of patches in fabrics I loved and was very slowly piecing them together. That’s about where life interfered. The box was put on a shelf with my quilting fabrics, and quilting was largely forgotten.
 Fast forward to last year, when I decided to take up quilting once more. As I was organizing my fabric stash, I came across the box and realized I still loved the fabrics and the design of the quilt. Hand quilting no longer held any appeal for me, so I would need to put the blocks together by machine.
Circular blocks are not the easiest to put together at the best of times, and these blocks presented some massive challenges. Because the templates were home made and not particularly accurate, the patches weren’t very accurate either.
 But the bigger problem was that you make templates for hand and machine quilting differently. For machine quilting, you add the 1/4″ seam allowance to your template, and cut along that line. You line up the edges of your patches and use a quarter inch seam while sewing.
For hand piecing, you make the template the size of the patches, draw around the patches and use that line to align your patches.
Your seam allowance doesn’t have to be accurate because you are sewing on the lines. And mine were extremely inaccurate!
It took quite a lot of fiddling to get the blocks to come together, and some of them never did lie flat. But once I got the quilt top together, I loved how the colors flowed from one block to another and across the quilt. I used the circles to add a variety of free motion quilting motifs, adding another layer of design to the quilt (and hiding some of the block imperfections). Despite the difficulties, or maybe because of them, it is now my favorite quilt, used to cuddle up with almost every evening since it was made.
 If you have ever considered quilting but were intimidated by the idea of all the pieces and the accuracy needed, I hope my quilt is an encouragement to give it a try. I invite you to come take a look at my blog where I share the process I go through while making my quilts as well as the finished quilts. Cheers!
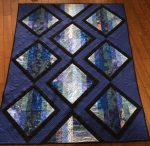
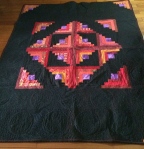
I asked Lori for some more pictures of her other quilts, so here they are – if you click on any of them they will turn into a slide show. Please remember they are HER COPYRIGHT – so ASK before you use them anywhere else!
This month, I branched out a bit and added some rather dramatic fabrics to my stock, some of which are great for quilting – please see “new in…”