Tag Archives: free pattern

Pattern for Felted Mittens – Recycling your old woollen jumpers/sweaters

Standard

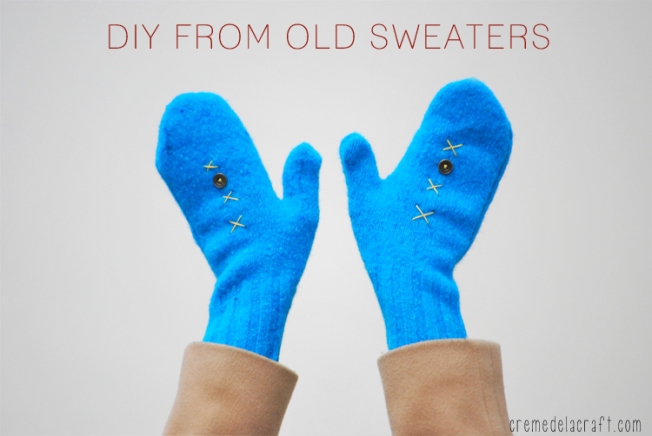
DIY-Make-Sew-Mittens-Recycle-Sweaters-Craft-Idea

It’s not yet winter here in the UK, but it might be an idea to think about preparing for it!

There are quite a lot of links on Pinterest for projects that recycle your old clothes, rather than just throwing them out, or giving them to the charity shops.

This is a very simple fun project for you to try, even if you can’t knit – and especially if you mistakenly ruined one of your favourite woollen jumpers by washing it on the hot cycle.   

Actually – this is a process often used in craft projects – it’s called FELTING WOOL!  You can use it for all types of woollen items to make a denser and stronger piece of fabric out of any knitted – or even woven – wool.  It doesn’t work for knitted items made from other materials.  As you will see, if you don’t already know (smile) – it shrinks the wool – the hotter the wash the smaller your jumper/sweater will come out – so do take care when washing wool you don’t want to shrink!

The short video below has been taken from Creme de la Craft, although there are various other sites that have instructions for the same process.   They have used a plain coloured jumper, that you can decorate any way you like.   Using patterned wool items can give you some very attractive mittens too!  
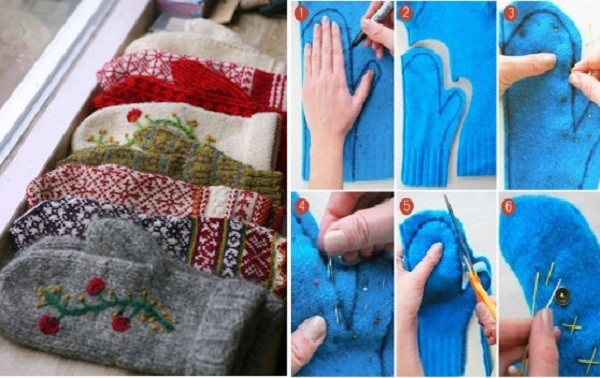
Warm-Sewing-Projects-From-Old-Sweaters-1

You can also find lots of sites that use the felted wool for other projects – quite a lot of them for slippers too!

You will need:

Materials: 

•  Wool sweater (at least 80% wool, but preferably 100%)
•  Marker or pen for tracing
•  Scissors

•  8-10 straight pins
•  Embroidery floss matching the color of your sweater
•  Sewing needle
• Buttons and additional embroidery floss for decorating

Instructions:

Prep the sweater: Wash your sweater on the warm cycle then dry it on high heat. This will felt the wool fibers together so they won’t fall apart when you cut them (kind of like tangled hair). Your sweater will shrink significantly. Tip: Place your sweater in a mesh laundry bag to avoid the wool fibers from clogging your machine.

Flip over + trace: Turn the sweater inside out and lay it flat on a table. Lay your hand on one of the side edges of the sweater and trace a mitten shape around it with a marker or pen. Add about a half-inch all the way around your hand to allow for seams. Leave about an inch or two at the bottom to create a cuff. Since the bottom of sweaters are already ribbed and finished, this creates a great cuff for the mitten.

Cut: Cut out your traced mitten, leaving about an inch or two of fabric around it.
Pin: Secure the front and back layers with several straight pins along the edges. This will ensure the two layers will stay even while you’re stitching.
Sew: Thread your needle with embroidery floss and do a simple running stitch along your tracing. Make sure to leave the bottom of the mitten wide enough so that your hand can easily fit through.
Trim: Trim about a quarter-inch around the stitching to remove the excess fabric. Be careful not to cut too close to the stitching, or it may fall apart.
Flip: Now the fun part! Flip over the mitten to see your finished product.
Decorate: Use buttons and colorful embroidery floss to decorate!
Repeat: Repeat all steps on the opposite side of the sweater.

HAVE FUN!

Knitting with Slip Stitches – and another free pattern

Standard

cowl-8-768x1024With this blog in mind, I often bookmark articles I’ve found online, to share with you.  This one, which I have edited slightly, comes from Interweave and was published on September 09, 2015 by Joni Coniglio

What is a slip stitch? Pretty much just what it says: you slip a stitch from one needle to the other without working it. In knitting, there are many reasons to slip a stitch intentionally. In colorwork knitting, slipping stitches makes it easy to achieve the look of more complex colorwork techniques with little more effort than when working simple stripes. If you’re working a color stripe pattern and you slip stitches on the first round of a color change, the color from the previous round will be drawn up into the current round and it will look as if you’ve worked with two different colors on the same round. But you can do much more than imitate other colorwork techniques. You can also create effects that are unique to slip-stitch knitting.

When you slip stitches without working them, the yarn must be carried from one worked stitch to the next, spanning one or more unworked stitches. The resulting yarn strand, or float, is carried either behind or in front of the slipped stitch (or stitches). If you slip a stitch with the yarn in front, the floats that are carried across the front of the work become a decorative element. (Just make sure to bring the yarn to the back of the work again when you’re ready to knit the next stitch or you’ll end up with a yarnover increase.)

If you’ve never tried slip-stitch colorwork, start with the simple polka dot pattern above. Before you know it, you’ll be hooked!

TRY THIS PATTERN FOR A POLKA DOT TUBE COWL – it will make a useful scarf for this winter.

PLEASE NOTE THAT THIS PATTERN DOES NOT TELL YOU WHAT SIZE NEEDLES TO USE, OR WHAT YARN TO USE – YOU CAN MAKE IT UP FOR YOURSELF!

HOWEVER, TO CONTROL THE SIZING – IT WOULD BE A GOOD IDEA TO TRY KNITTING A SMALL SWATCH WITH YOUR CHOSEN NEEDLES AND YARN FIRST!

The polka dot pattern is a great introduction to slip-stitch knitting. Here’s what you’ll need:

  • 16″ circular needle
  • at least two colors of yarn (but use as many as you like), a main color (MC) and contrast color (CC)
  • stitch marker

Note: Slip stitches purlwise with yarn in back.

With MC, and using a provisional method, cast on a multiple of 4 sts. Place marker and join in the round.
Rounds 1 and 2 With CC, *slip 2, k2; rep from * to end.
Rounds 3 and 4 With MC, knit.
Rounds 5 and 6 With CC, *k2, slip 2; rep from * to end.
Rounds 7 and 8 With MC, knit.
Repeat Rounds 1-8 for pattern, ending with Round 6.

Block and join the ends of the cowl using three-needle bind-off or Kitchener stitch and MC.

NB:  You can also try this sequence without using circular needles – to make a ‘flat’ scarf.  Choose the width you want the scarf, and double it – so that you can sew the two edges together.  The pattern above can be adapted in any way you want, and don’t worry about the ‘technical’ names of  knitting stitches – you can choose the way you like to cast on and cast off!

Start knitting this now and you could easily finish making your cowl or scarf in time to give it to someone as a Christmas present.

And – if you are looking for Christmas presents – have a look at my shop on etsy, and my listings on ebay.  If you are not registered with either of these sites, you are welcome to buy direct.